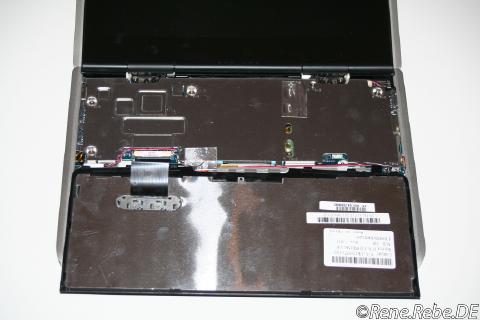
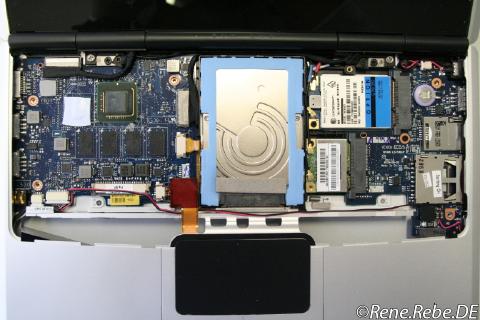
Dissect, disassemble, open the Nokia Booklet
So you want to upgrade the quite slow Toshiba, MK1235GSL (4200rpm, quickly auto head parking, so that (any OS) UI freezes on FS object access until the disk spun up again).
Fortunately it is pretty easy to open, disassemble the Nokia Booklet. The keyboard can be flipped open by pressing back 2 clips with a plastic (like credit) card, and the keyboard sides with either a tiny plastic tool, or a fingernail.

After that just a couple of Torx screws i the thin metal shield are awaiting to gain full access to the main circuit, PCB board.

Unfortunately the memory is directly soldered onto the board (thank God the 1GB are already 4 times as much as the 256MB in Apple’s iPad, …). However, e.g. the hard disk can easily be lifted off it’s rubber shock absorber and certainly be exchanged for an SSD, for example and Intel X18-M (Postville) G2.

Update: It turned out installing Windows 7 onto the new SSD was not that easy. The installer would just hang while creating the partition, or formatting and existing one. Sometimes it would just display an not too helpful error code: 0×80070057. Neither Linux nor Mac had and issue, and according to the SMART info the SSD did look brand new (e.g. not an sent back RMA Monday flavor). I even imagined the partitions as created by the Linux fsdisk where aligned in a way conflicting with Windows, but deleting the partitions in the Windows installer and let it just create a single, whole disk one did not help either. The best I could archive this way was the installer to hang, stall at copying the setup files at 0%.
After quite some back and forth and internet research I concluded that the issue might be caused by the PATA to SATA bridge chip as used in the Nokia Booklet simply not handling the new TRIM command properly (that is certainly not at all). While TRIM is certainly nice to have on this already quite “slow” Netbook, I could certainly live without it. However, I could not find a straight forward way to turn it off. A Microsoft FAQ mentioned a fsutil program, which unfortunately is not available in this early Windows 7 install system:
behavior set DisableDeleteNotify 1
Fortunately it can also be disabled via the Registry, running regedit.exe from the command line in the repair tools area of the Windows 7 setup. Simply search for the “DisableDeleteNotify” key (HKEY_LOCAL_MACHINE, SYSTEM, ControlSet001, Control, FileSystem, DisableDeleteNotification) and set it to 1, …
Update 2: Unfortunately the Windows installer is not smart enough to transfer the changed registry values to the newly extracted Windows partitions. Therefore after the first file extraction pass Windows will again hang upon the first reboot. Unfortunately, yes - again, I found no way to edit just this single registry value (”DisableDeleteNotify”) in this fresh partition. Neither with the fail safe mode, nor the recovery utils on the installer DVD.
After and endless back and force, reboot this, and that, the half installed system, and the genuine install DVD, I decided to use my Linux to make the reged.

April 13th, 2010 at 1:38
Thank you for your dissection photos as there is not too many of them online.
For instructions regarding Windows 7 on SSD supporting TRIM operation see http://discussions.europe.nokia.com/t5/Mini-Laptops/SDD-compatibility-the-real-reason-why-some-do-work-and-some-do/m-p/665782#U665782
Or you could go with Intel X18-M G1, you shouldn’t loose anything and have saved some time ;)
April 13th, 2010 at 7:44
That support site does not list anything new in regards to the Windows 7 SSD trim issue due to the PATA to SATA bridge. As I wrote, I already got Windows 7 on the Booklet the other day.
The problem with the older Intel G1 SSD is, that due to the older manufactoring process (50nm vs 45nm IIRC) they are still even more expensive, and the last G1 firmware versions also offer TRIM support, … Even without TRIM being used, the G2, Postville performance should still be a little better, and I guess (hope) they further polished, and fine-tuned the firmware, especially for long term performance and durability.
September 6th, 2010 at 20:41
I did the same: but bad performance
max 55 MBIT/s read with an ssd which is able to handle 200 MBIT/s
any solutions? maybe the original driver is bad oder the controller is too weak
thanks for any solutions posted right here
September 6th, 2010 at 20:58
I guess you mean MByte instead of MBit?
Well, I get approx. 40MByte/s write (into an HFS+ file under OSX) and 58MB/s read performance (from the same test file in an FS, under OSX, too). Without an file system in between the numbers might be slightly higher.
The limiting factor certainly is the Intel Poulsbo SCH, which only implements PATA and the Nokia Booklet is using an PATA to SATA bridge to connect the disk, …
This transfer rate, and especially latency is if course magnitudes better then the very slow 1.8″ Toshiba drive Nokia ships. So it is still a vast performance improvement for the otherwise laggy Z-series Atom system, …
May 3rd, 2012 at 0:11
Thanks for posting your experience upgrading your drive. I followed your post to install an Intel 320 series SSD in my Nokia Booklet 3G, and have happily been running Ubuntu and MeeGo the past few months. I’m going to be re-sizing my Ubuntu partition and putting Mac OS X on there, using your posts on that.
Did you end up writing up a procedure for that when you did that, or can you point me toward someone who did? Thanks!
May 5th, 2012 at 13:24
There are most hints in the other post - IIRC someone wrote a google doc document, but the last time I checked it was gone (lesson learned: post on real websites, not web app documents, …).
Anyway, due missing graphic acceleration and suspend to RAM I can only recommend OS X on the Booklet to not to picky people, e.g. hard core developers, …
October 23rd, 2013 at 20:30
Dear rene, i am experience same problems, i just bought KDC380 Kingstom SSD 60 GB. Could you please give me more details about using your tool reged to disable trim commands, my windows installation dont reboot, thanks in advance
November 13th, 2013 at 11:19
Just regedit, … however as I am not such a Windows pro I could not figure out how to do so with the fresh installed windows, and instead then used my Linux and the ntpasswd package to edit the registry, …